Home
/ How To Draw A Cake Easy, Free Birthday Cake Drawing Download Free Birthday Cake Drawing Png Images Free Cliparts On Clipart Library, Connect them by drawing straight line on right and left side of the ellipses.
How To Draw A Cake Easy, Free Birthday Cake Drawing Download Free Birthday Cake Drawing Png Images Free Cliparts On Clipart Library, Connect them by drawing straight line on right and left side of the ellipses.
How To Draw A Cake Easy, Free Birthday Cake Drawing Download Free Birthday Cake Drawing Png Images Free Cliparts On Clipart Library, Connect them by drawing straight line on right and left side of the ellipses.. Kids, learn how to draw the cake by following the steps below. We really love sweets and that's why we created this guide on how to draw a birthday cake. Learn how to draw cake simply by following the steps outlined in our video lessons. Most cakes are round, after all! Leave space above and below your ellipse, since this will serve as the top of your cake and you don't want to run out of room for the strawberries or the bottom layers.
3.draw the outline of the first layer of cake. At the bottom, draw some curves. How to draw a mile high cake. Simply draw a line parallel to the base part of the cake and add a squiggly line on the right, rounded, side of the piece of cake. The icing line should then curve down and also run along the back of the slice.
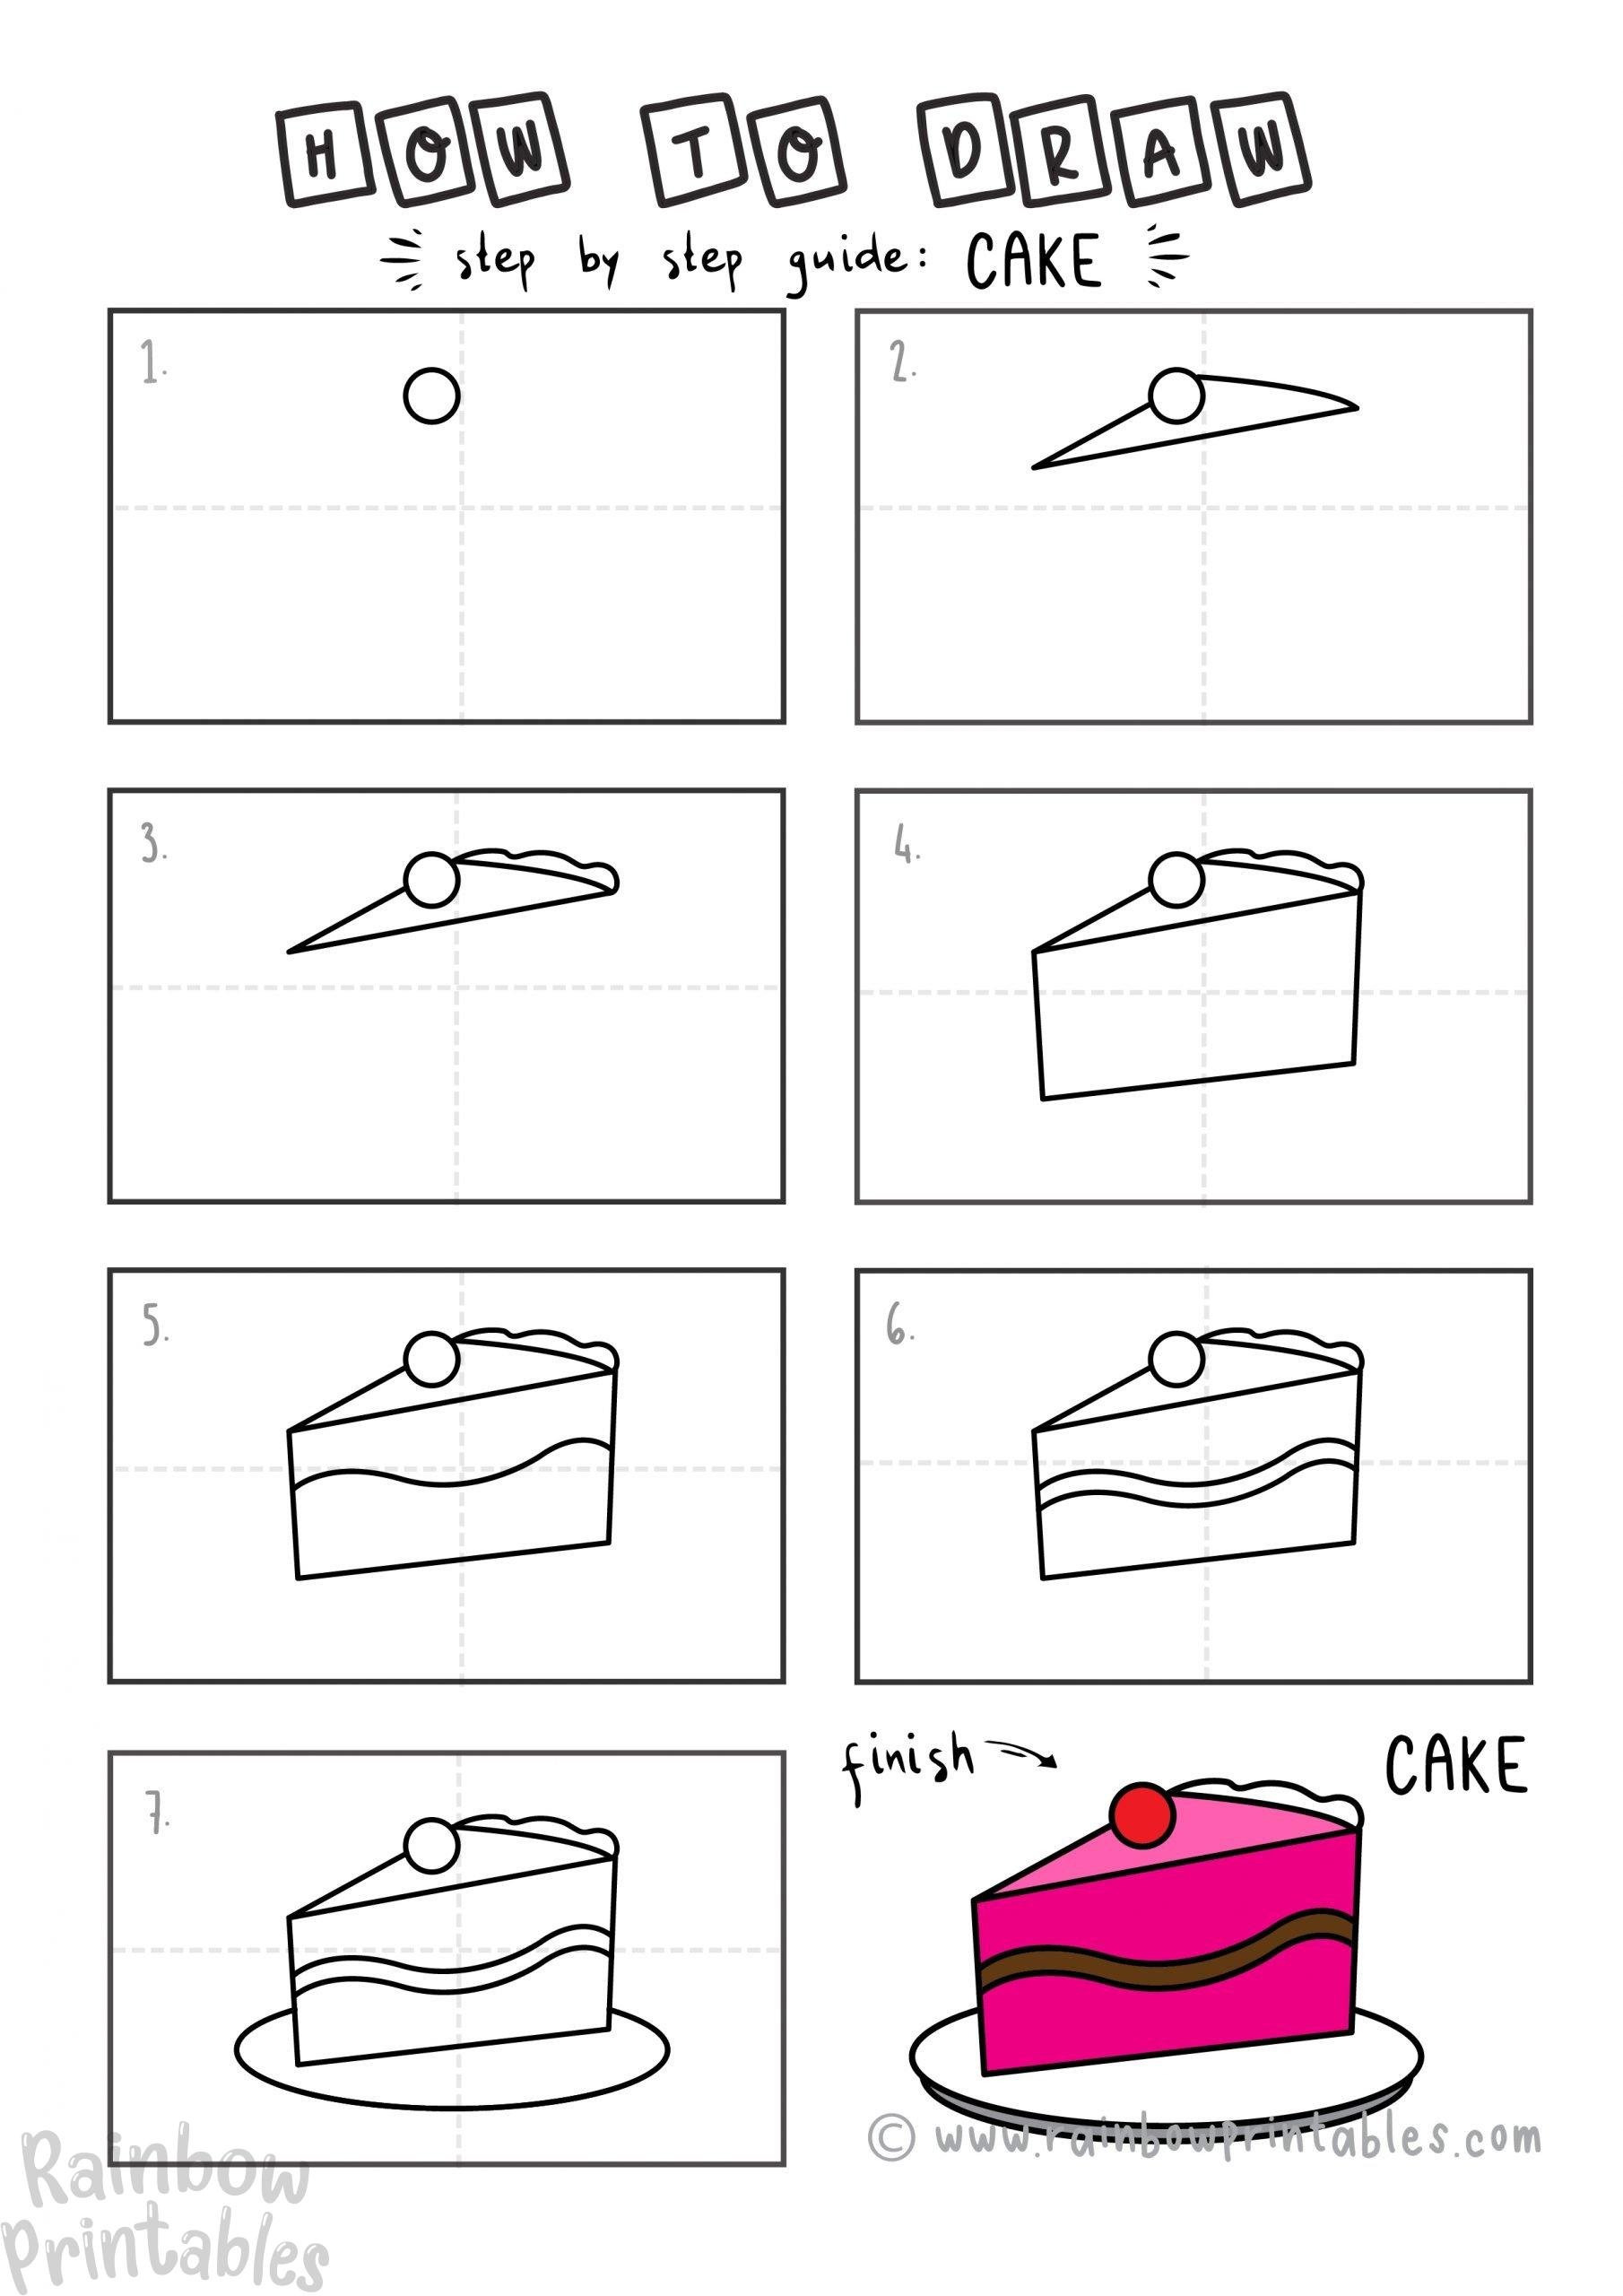
How To Draw A Slice Of Cake 8 Easy Steps Guide For Young Kids Rainbow Printables from rainbowprintables.com And we start to draw the top layer of this cake. On the top, draw a flame. 3.draw the outline of the first layer of cake. How to draw a simple cute cake step by step. Learn how to draw cake simply by following the steps outlined in our video lessons. How to draw cake step one the key to drawing is starting with the large simple shapes. Draw two medium ellipses below the small ones. Then in the top oval draw a smaller curve and a little higher draw another.
In its place, draw a wavy curved line.
Learn how to draw cake simply by following the steps outlined in our video lessons. How to draw a mile high cake. Most cakes are round, after all! 2 add a small water droplet shape to the top of the triangle. The team of easydrawingart.com shows how to draw different objects in the simplest way. This is always a very tasty and sweet thing that is served at the end of the holiday. Remember that the back should be curved; In its place, draw a wavy curved line. Draw this birthday cake by following this drawing lesson. Use light, smooth strokes for sketching. Kids, learn how to draw the cake by following the steps below. 2 add a line under each side of the ellipse. Do not press hard on the pencil.
Draw the top part of the birthday cake by first making two small marks far apart from each other. 1.first draw three cherries, then draw an oval. Do not press hard on the pencil. Learn how to draw cake simply by following the steps outlined in our video lessons. Then in the top oval draw a smaller curve and a little higher draw another.
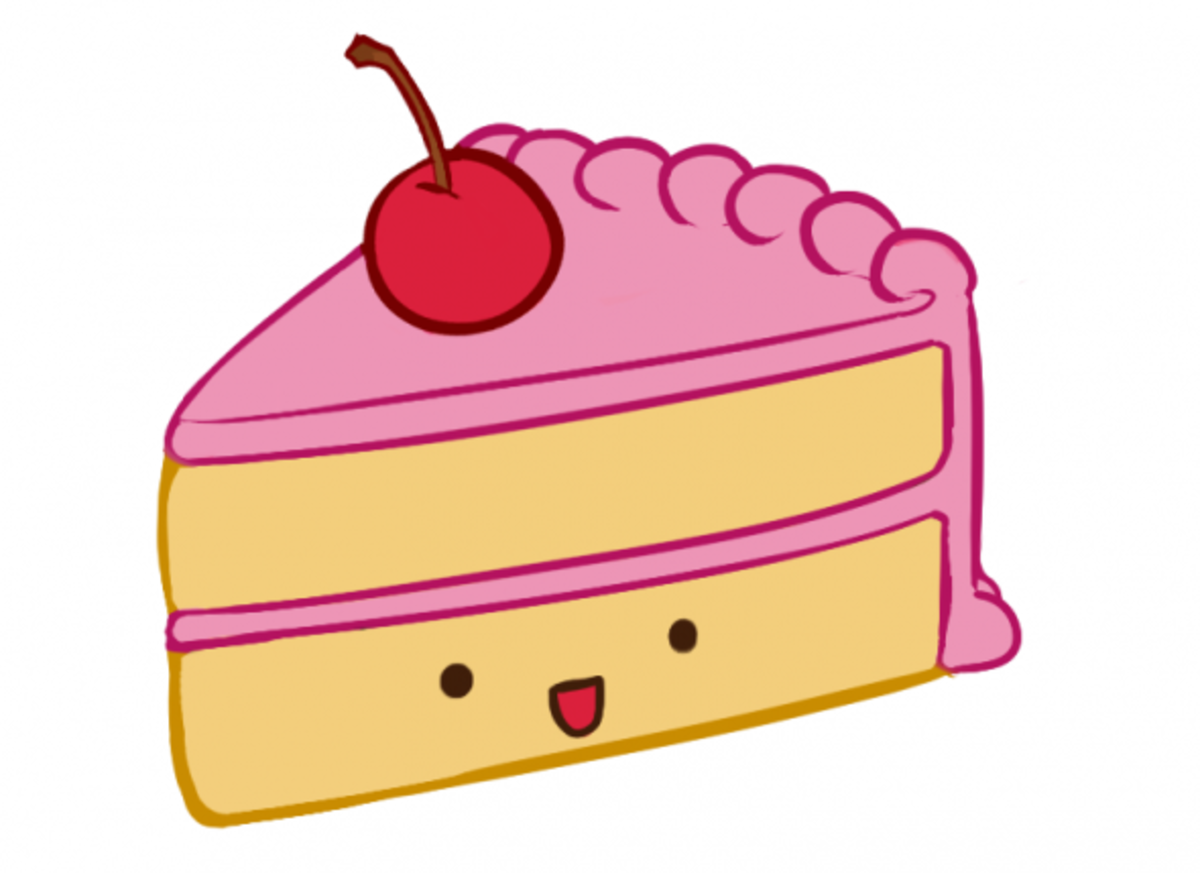
How To Draw A Kawaii Cute Cake Slice Feltmagnet from images.saymedia-content.com 3.draw the outline of the first layer of cake. We divide the process of creating a work of art into several simple stages (in this case, six steps) and paint all the new lines in red. Leave space above and below your ellipse, since this will serve as the top of your cake and you don't want to run out of room for the strawberries or the bottom layers. First, draw a horizontally elongated oval. 2 add a small water droplet shape to the top of the triangle. 1.first draw three cherries, then draw an oval. Simply draw a line parallel to the base part of the cake and add a squiggly line on the right, rounded, side of the piece of cake. Now connect all of the marks together using curved lines to form the top part of the cake.
Draw small half circles below the 1st and 2nd half ovals.
Draw an ellipse (a flat circle). 1.first draw three cherries, then draw an oval. Make one line just below the top for the chocolate layer and one more slightly lower down to define the icing. Draw an oval in centre of the paper. Below the oval, draw 4 half ovals with equal spaces. This is always a very tasty and sweet thing that is served at the end of the holiday. Let´s divide the cake into three equally big parts to indicate that our cake was layered. How to draw a mile high cake. Erase the top line of the top layer of the cake. 2.draw the two sides of the cake. First, draw a horizontally elongated oval. And two big ellipses at the bottom. Draw small half circles below the 1st and 2nd half ovals.
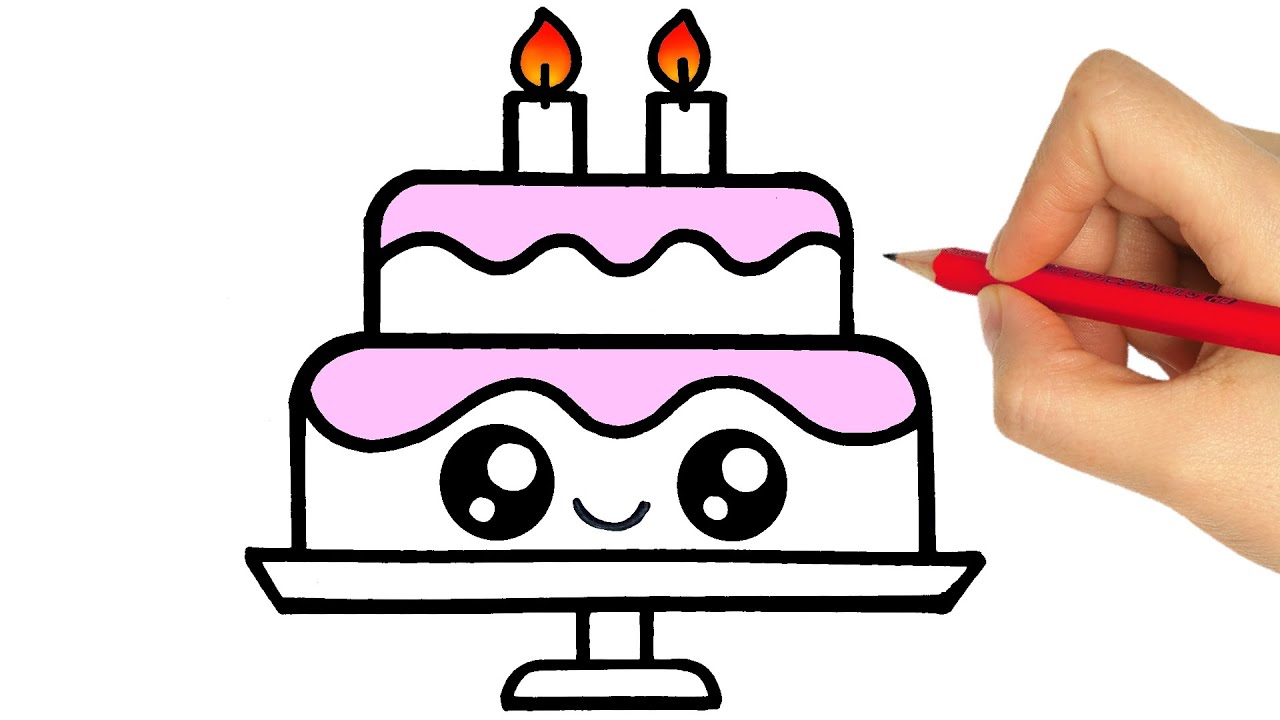
Draw this birthday cake by following this drawing lesson. In this video, you will learn how to draw a super kawaii birthday cake step by step :) if you want to see more of my videos , click here : Between the first two marks, draw two more marks that are close to each other. Then in the top oval draw a smaller curve and a little higher draw another. On the top, draw a flame.
How To Draw A Birthday Cake Easy Step By Step Kawaii Drawings Social Useful Stuff Handy Tips from i.ytimg.com Draw a straight line to form the bottom of the cake, running parallel to the top of the slice. Simply draw a line parallel to the base part of the cake and add a squiggly line on the right, rounded, side of the piece of cake. Most cakes are round, after all! First, draw a horizontally elongated oval. Take a pencil and draw two equal ellipses parallel to each other. And two big ellipses at the bottom. 2 add a small water droplet shape to the top of the triangle. On the top, draw a flame.
We really love sweets and that's why we created this guide on how to draw a birthday cake.
4 steps to draw a cake. Follow along and draw a cute birthday cake! The team of easydrawingart.com shows how to draw different objects in the simplest way. Draw a pointy triangle and add some diagonal lines. Repeat the procedure one more time. 2 add a line under each side of the ellipse. At the bottom, draw some curves. How to draw a birthday cake easy and step by step. Remember that the back should be curved; On the top, draw a flame. How to draw cake step one the key to drawing is starting with the large simple shapes. Make one line just below the top for the chocolate layer and one more slightly lower down to define the icing. Draw two medium ellipses below the small ones.